How to Create News App with awesome UI in flutter using 'News API' and 'swiper', 'http' packages?
Hii Flutter Developers...
In this article, I will explain to you about How to Create News App with awesome UI in flutter using 'News API' and 'swiper', 'http' packages,
we are going to build a news app like 'news republic', 'uc news app', 'uc browser news' etc.
But in this, we are going to use News Api ( free API ) for creating a news app with awesome UI.
We are using a swiper (flutter_swiper) package for creating beautiful looking Swiper, which automatically swipes news from right to left.
How to set up News API for our app?
Step By Step:-1) Goto the News API console ( newsapi.org ), click on the Login button.
2) Enter your credentials.
3) After login, you will get your secret API key, which we can use with our API.
 |
| free secret API Key |
4) We need to use this API as shown in the below.
 |
| News api |
How to Create a News App with awesome UI (User Interface)?
Step By Step:-1) Remove all the previous code.
2) We need "flutter_swiper" and "http" package.
3) Goto the "swiper" (flutter_swiper package) (https://pub.dev/packages/flutter_swiper#build-in-layouts)
4) Copy the dependency and paste it in pubspec.yml file.
 |
| pubspec.yml file |
5) Import all the necessary packages.
 |
| import packages |
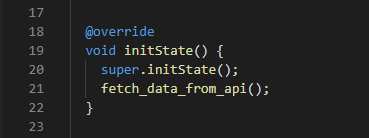
6) Use the InitState method to create a separate method for fetching all data from API.
 |
| InitState method |
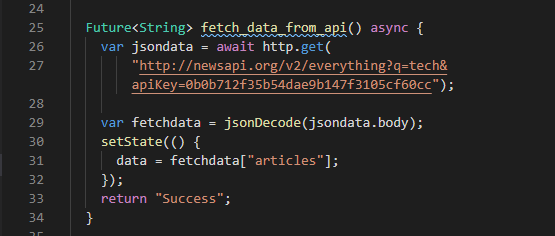
7) Create a separate method to fetch all data.
 |
| separate method |
8) We need to use the 'flutter_swiper' package for creating a beautiful user interface.
 |
| flutter_swiper |
9) Use Stack widget for creating an awesome layout that looks like Cards.
10) Create a new dart page for showing details of news like title, author, description, publishedAt.
 |
| detailspage.dart |
12) Use Navigator to send data to the details page, so when the user clicks on particular news it will be redirected to the details page.
 |
| Navigator.push |
13) Create Constructor in detailspage.dart page for accepting data.
 |
| Constructor in detailspage.dart |
You may also like:- Create your first API using 'Deno' and fetch all the data from API in the Flutter app using 'http' package !!!
Video Tutorial :-
Whole code of main.dart page:-
import 'dart:convert';import 'package:flutter_swiper/flutter_swiper.dart';
import 'package:flutter/material.dart';
import 'package:http/http.dart' as http;
import './detailspage.dart';
void main() => runApp(MyApp());
class MyApp extends StatefulWidget {
@override
_MyAppState createState() => _MyAppState();
}
class _MyAppState extends State<MyApp> {
List data;
@override
void initState() {
super.initState();
fetch_data_from_api();
}
Future<String> fetch_data_from_api() async {
var jsondata = await http.get(
"http://newsapi.org/v2/everything?q=tech&apiKey=0b0b712f35b54dae9b147f3105cf60cc");
var fetchdata = jsonDecode(jsondata.body);
setState(() {
data = fetchdata["articles"];
});
return "Success";
}
@override
Widget build(BuildContext context) {
return MaterialApp(
title: "News App",
theme: ThemeData(
primaryColor: Colors.white,
),
home: Scaffold(
appBar: AppBar(
title: Text("News App"),
),
body: Padding(
padding: EdgeInsets.only(top: 30.0),
child: Swiper(
itemBuilder: (BuildContext context, int index) {
return InkWell(
onTap: () {
Navigator.push(
context,
MaterialPageRoute(
builder: (context) => DetailsPage(
author: data[index]["author"],
title: data[index]["title"],
description: data[index]["description"],
urlToImage: data[index]["urlToImage"],
publishedAt: data[index]["publishedAt"],
)));
},
child: Stack(
children: <Widget>[
Padding(
padding: EdgeInsets.all(10.0),
child: ClipRRect(
borderRadius: BorderRadius.only(
topLeft: Radius.circular(35.0),
topRight: Radius.circular(35.0),
),
child: Image.network(
data[index]["urlToImage"],
fit: BoxFit.cover,
height: 400.0,
),
),
),
Padding(
padding: EdgeInsets.fromLTRB(0.0, 350.0, 0.0, 0.0),
child: Container(
height: 200.0,
width: 400.0,
child: Material(
borderRadius: BorderRadius.circular(35.0),
elevation: 10.0,
child: Column(
children: <Widget>[
Padding(
padding: EdgeInsets.fromLTRB(
20.0, 20.0, 10.0, 20.0),
child: Text(
data[index]["title"],
style: TextStyle(
fontSize: 25.0,
fontWeight: FontWeight.bold,
),
),
)
],
),
),
),
)
],
),
);
},
itemCount: data == null ? 0 : data.length,
autoplay: true,
viewportFraction: 0.8,
scale: 0.9,
),
)));
}
}
You may also like:- How to Create a Music Player app in flutter using Firebase (Cloud firestore,firebase storage) and 'music_player' plugin ?
Whole code of detailspage.dart:-
import 'package:flutter/material.dart';class DetailsPage extends StatefulWidget {
String title, author, urlToImage, publishedAt, description;
DetailsPage(
{this.title,
this.author,
this.description,
this.publishedAt,
this.urlToImage});
@override
_DetailsPageState createState() => _DetailsPageState();
}
class _DetailsPageState extends State<DetailsPage> {
@override
Widget build(BuildContext context) {
return Scaffold(
body: SingleChildScrollView(
scrollDirection: Axis.vertical,
child: Stack(
children: <Widget>[
Image.network(
widget.urlToImage,
fit: BoxFit.cover,
width: MediaQuery.of(context).size.width,
height: MediaQuery.of(context).size.height * 0.5,
),
Padding(
padding: EdgeInsets.fromLTRB(0.0, 350.0, 0.0, 0.0),
child: Container(
height: MediaQuery.of(context).size.height,
width: MediaQuery.of(context).size.width,
child: Material(
borderRadius: BorderRadius.circular(35.0),
child: Column(
children: <Widget>[
Padding(
padding: EdgeInsets.fromLTRB(20.0, 20.0, 20.0, 20.0),
child: Text(
widget.title,
style: TextStyle(
fontSize: 30.0,
fontWeight: FontWeight.bold,
),
),
),
Text(
widget.publishedAt.substring(0, 10),
style: TextStyle(
fontSize: 20.0,
),
),
Padding(
padding: EdgeInsets.all(20.0),
child: Text(
widget.description,
style: TextStyle(
fontSize: 25.0,
),
),
),
Text(
widget.author,
style: TextStyle(
fontSize: 15.0,
),
),
],
),
),
),
)
],
),
),
);
}
}
Output:-
You May Also like:- How to create Tinder Swipe Cards in Flutter using 'flutter_tindercard' package ?
Thank you guys for spending your valuable time in reading this article, if you have any doubts please ask me those doubts in the comment section below.


0 Comments